Your server gets a request. It has the right URL, the right headers and a valid user token. But did it come from your app? Or from a script that copies what your app sends? With normal tools, the server cannot know.
Device attestation is the answer to this question. On iOS it is called App Attest. I wanted to understand it properly, so I built a small demo with a SwiftUI app and a Swift server. This post explains what device attestation does, why it exists and when you should use it.
The short version
- Device attestation proves to your server that a request comes from your real app on a real Apple device.
- The device creates a key inside the Secure Enclave. Apple signs a certificate for that key. Your server checks it.
- After that, the app signs every important request with the key. The server checks the signature and a counter.
- It stops scripts, modified apps, replayed requests and changed request bodies.
- It does not encrypt data and it does not tell you who the user is.
- Use it for requests that cost money or can be abused. Skip it for public, read-only data.
What is device attestation?
Attestation means “someone you trust confirms something for you”. In device attestation, the one you trust is the platform owner. On iOS that is Apple, with the App Attest service (part of the DeviceCheck framework, iOS 14 and later). On Android the same idea is called Play Integrity.
Apple confirms three things to your server:
- The key was created on a real Apple device, inside the Secure Enclave.
- The key belongs to your app. Your Team ID and bundle ID are part of the proof.
- The app binary is the one you shipped, not a changed copy.
Why do we need it?
Everything inside an app can be read. An API key in the binary can be extracted in a few minutes. A user token does not help either, because a real user can log in and then send requests from a script, or from a modified app. For the server, all of these look the same.
Device attestation gives the server a way to tell them apart. A script has no Secure Enclave key signed by Apple. A modified app cannot get one for your App ID.
How App Attest works
There are two parts. The first one happens once per install. The second one happens on every request you want to protect.
Part 1: Attestation (once)
The app creates a key pair in the Secure Enclave. The private key never leaves the chip. Then the app asks your server for a challenge, which is a random value that can be used only one time. The app sends the hash of this challenge to Apple, and Apple returns an attestation object. Inside it there is a certificate chain signed by Apple.
- 1AppCreates a key in the Secure Enclave and gets a key ID
- 2App → ServerAsks for a one-time challenge
- 3App → AppleSends the key ID and the challenge hash, gets the attestation back
- 4App → ServerSends key ID, challenge and attestation
- 5ServerChecks everything, then saves the public key with counter 0
On the server, the important checks are these:
- The certificate chain ends at the Apple App Attestation Root CA.
- The certificate contains a nonce made from your challenge. So the attestation was made for this request and is not an old one.
- The App ID hash is the hash of
TEAMID.bundleID. So the key belongs to your app and not to another one. - The key ID is the hash of the public key, and the counter is 0.
Part 2: Assertion (every protected request)
Now the server knows the public key. For each important request, the app gets a new challenge, puts it inside the request body and signs the body with the key. This signature is called an assertion. Apple is not involved in this part, it all happens on the device.
- 1App → ServerAsks for a one-time challenge
- 2AppSigns the request body (with the challenge inside) in the Secure Enclave
- 3App → ServerSends key ID, request body and assertion
- 4ServerChecks challenge, signature, App ID and counter. Then runs the request
On the client side, the whole thing is three calls:
let service = DCAppAttestService.shared

// once
let keyId = try await service.generateKey()
let attestation = try await service.attestKey(keyId, clientDataHash: challengeHash)

// every protected request
let assertion = try await service.generateAssertion(keyId, clientDataHash: bodyHash)
The hard part is on the server. You need to decode CBOR, validate a certificate chain and check a signature. Apple does not give a server library for this, so I wrote the checks in Swift with Vapor. You can read them in the demo repository.
What does it stop?
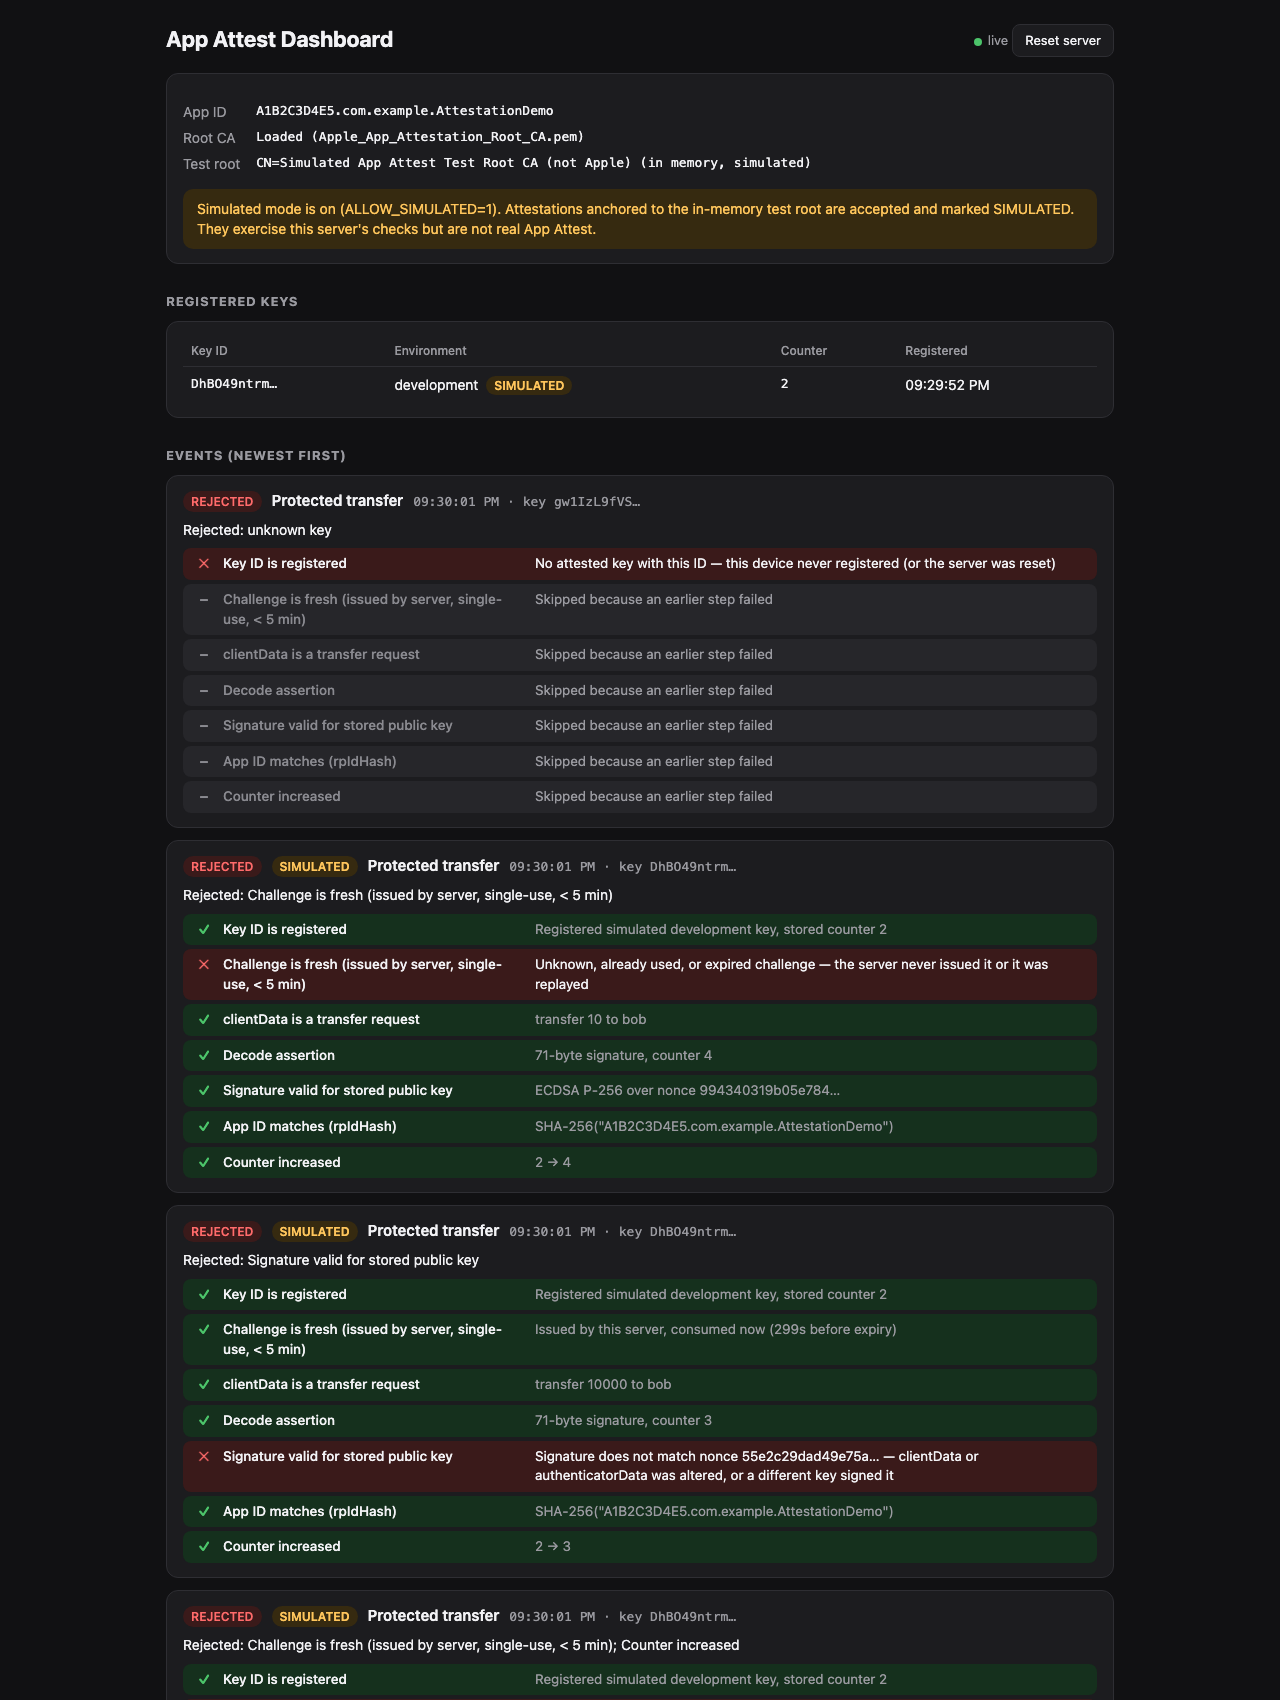
In the demo app I added four buttons that send bad requests. Every one of them is rejected, and each one fails at a different check.
- ReplayThe same request is sent again. The challenge is already used and the counter is not higher.Rejected
- TamperThe app signs amount 10, then the body is changed to 10000. The signature does not match.Rejected
- Fake challengeA valid signature, but over a challenge the server never gave.Rejected
- Unknown keyA key ID that was never attested. There is no public key to check with.Rejected
What it does not do
- It does not encrypt anything. You still need HTTPS.
- It does not identify the user. You still need login. Attestation says “this is my app”, login says “this is this user”.
- It is not a perfect jailbreak detector. Apple says to use it as one signal in your risk decision, not as the only one.
- It does not work in the Simulator. You need a physical device to test it.
When to use device attestation
Use it when a fake request costs you something:
- Payments, transfers and anything about money.
- Promo codes, rewards, referral bonuses and free trials.
- Endpoints that are expensive for you, for example an AI feature that calls a paid model.
- Account creation, to slow down bots that open thousands of accounts.
- Game scores and leaderboards.
You probably do not need it for these:
- Public data that anyone can read anyway.
- Internal or enterprise apps where you already control the devices.
- An early prototype. It adds server state and more ways for a request to fail.
My advice is to start with one or two endpoints, not the whole API.
Things I learned while building the demo
- The key is lost when the user deletes the app or moves to a new phone. Your server must accept a new attestation from the same user.
- The attestation step calls Apple’s servers. It can fail or be slow, and Apple recommends turning the feature on for your users step by step, not for everyone on the same day.
- There are two environments, development and production. The entitlement decides which one, and the server can see it in the attestation.
- The server has to save a public key and a counter for every install. It is not stateless.
- Save the key and the counter only when all checks pass. If you update the counter on a failed request, an attacker can block a real user.
Try the demo
The code is on GitHub: repfly/ios-app-attest-demo. It has the SwiftUI app, the Vapor server with all the checks, and a dashboard that shows each check as green or red. The README explains how to run it on your own iPhone.
Summary
Device attestation answers one question: is this request from my real app on a real device? On iOS, App Attest does it with a Secure Enclave key, a certificate from Apple and a signature on every request. It is not hard on the client, most of the work is on the server. Use it where abuse costs you money, and keep your normal login and HTTPS as they are.